Descent Planner Instructions
Descent Planner is for planning tricky ski descents that involve difficult route finding through complex terrain where Google Earth/Fatmap data isn’t good enough. It’s effectively a more precise method of triangulating the points of your route to find its location.
The Quick Start Guide:
· Take several photos that include the route at least two known locations (e.g. mountain tops). The photos should be taken from different positions, try to cover a wide angle of views. Use a camera that can GPS tag the photos if possible.
· Drag the photos onto the browser window at http://descentes.eu/DescentPlanner/
· Add/edit the longitude/latitude/altitude at the bottom-right of each photo. The altitude especially is unlikely to be accurate from the GPS tags.
· In each photo, identify two known locations by creating a marker, dragging it onto the right part of the photo at full zoom, and entering the coordinates (latitude, longitude, and elevation). These are used to figure out the camera’s exact field of view, direction, and roll.
· In each photo, mark the points on the route that you want to ski. Giving markers the same name followed by a number (e.g. R1, R2, R3…) will create a path as well as the points.
· Download a KML file containing a GPS track to see the route in Google Earth.
However, the devil’s in the detail, and if you don’t read the below, it’s not going to work very accurately.
The In-Depth Guide
Before you start making real plans
First try this somewhere relatively safe such as within a ski resort where you can practice. Find a descent line where the Google Earth coverage is really good – that will allow you to see how accurate your line is. It takes some getting used to and some understanding – but it does work extremely well once you’ve figured it out.
If you’d like some sample photos to try this out, together with a completed configuration, you can download the sample files I’ve used in my example here.
Taking the Photos
A good quality smartphone will take photos that are more than adequate, and GPS tagged. Some tips:
· In advance of taking the photos, start running a GPS tracking app such as Strava, Fatmap, OruxMaps etc. Running tracking continually will help keep the GPS up to date.
· Make sure your camera is set to GPS tag / record the location in the photos. All smartphones and some expensive cameras will do this.
· Before taking each picture, open the GPS tracking app for a few seconds so you can make sure it updates the phone’s GPS position.
· In addition to the route, get two known locations in the photo. These locations are better if:
o They are a long way away (e.g. a mountaintop in the distance)
o They are relatively far apart on the photo
o You can precisely identify the location (the further away the location is, the less important this becomes).
· It’s useful to have photos using different known locations, just in case you have problems accurately identifying one later.
· If the known locations are just outside the width of the photo, you can sometimes fit them inside by taking the photo at an angle to show one in each corner. The software compensates for any tilt of the camera.
· Remember that the top of a mountain might not be where you think it is. If it’s set back from a cliff edge for instance, you might only be able to see the cliff and not the summit. This is another reason why it’s better to be a long distance from the peak – you’ll be looking at it almost horizontally and will almost certainly see the proper summit.
· The system will work with only two photos but take as many as you can from different locations and using different anchor points. You may find later that there is a photo that you can’t quite get lined up. If you have a lot more photos, you can delete the worst ones. And any smaller errors are likely to be averaged out over multiple photos.
· Try to get a wide range of angles looking at the route – 90 degrees is the ideal angle with just two photos.
· When the camera adds the GPS tag to the photo, the latitude/longitude will likely be fairly accurate but the elevation probably won’t be. There are a few different ideas to get accurate elevation:
o Make sure the GPS app is running in the foreground for a while with full sky exposure – the accuracy will improve over time.
o Avoid taking the picture near cliffs that will harm the GPS’s accuracy.
o Take the photo from a point where the elevation is referenced on a map, such as a col or peak.
o As above, but with a road – Google has run their vans around most roads using Street View and you’ll be able to get a more accurate elevation reading later from Google Earth.
o Take the photo from a large area that’s either flat or has a very even gradient. That will allow you to get a reasonable elevation from Google Earth afterwards. Google works out elevation by averaging over a series of points, so if you’re standing on the end of a cliff, the data is likely going to be very wrong.
o Use an altimeter that has been recently calibrated at a known point to record the elevation when you took the photo.
o If you’re using a drone to take the photos, the drone will contain an air pressure altimeter which is used to calculate the relative altitude from the take-off point. When you take the photo, record the relative altitude for later. This will be fairly accurate, the altitude tagged on the photo by the drone’s GPS will not be. Make sure you know the elevation of the take-off point of course.
Using the tool > setting up
You need to use a desktop PC or a laptop with a mouse or a touchpad – a smartphone/tablet won’t work, and you’ll need a scroll wheel on the mouse.
Put all of the photos you’ve taken into one folder, then point your browser at http://descentes.eu/DescentPlanner/
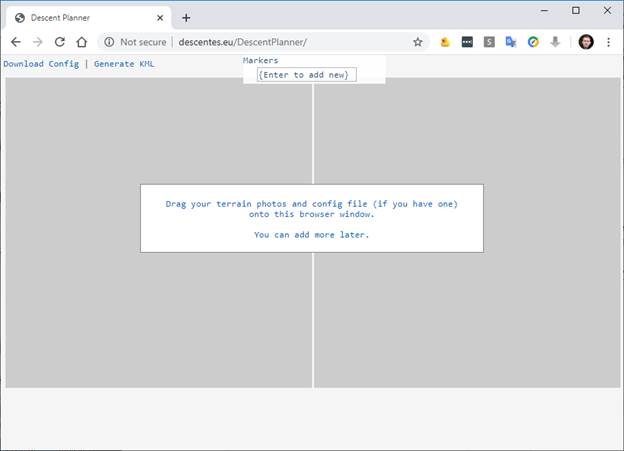
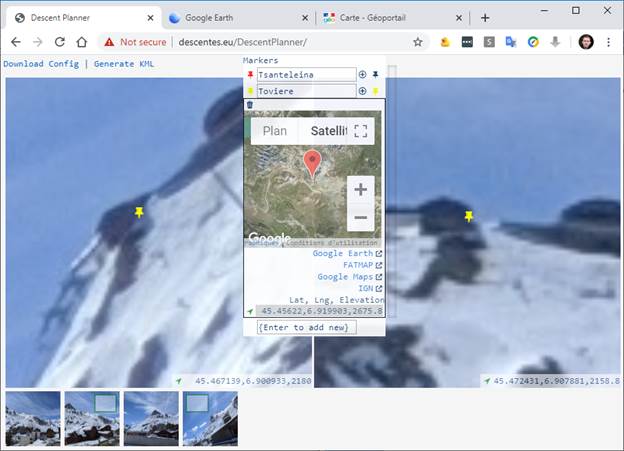
Now drag your photos onto the browser window. They’ll appear as thumbnails across the bottom, and the first two images will load into the larger panes:
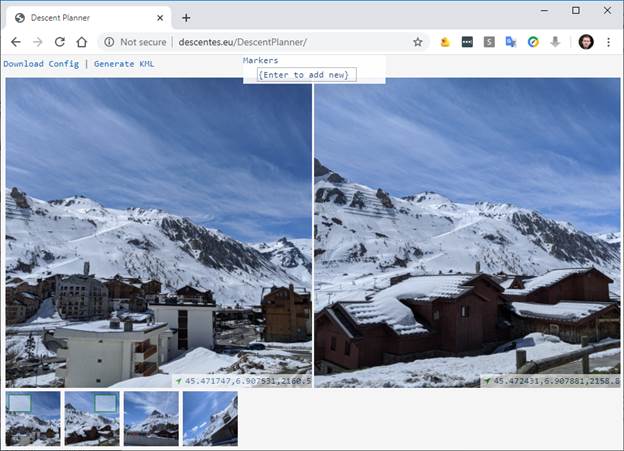
The green boxes on top of the first two photos in the bottom bar show that these are the images that have been loaded into the main windows.
To change an image in the main window, just drag the thumbnail you want into the pane.
To see which image is which, holding the mouse over the thumbnail will reveal the filename.
To delete an image, double-click on the thumbnail.
Setting Camera Positions
If your photos have GPS locations, the system will read the EXIF data and display it at the bottom right of the photo. You can click on these coordinates to edit the coordinates, or to link out to other systems and a to see a map:
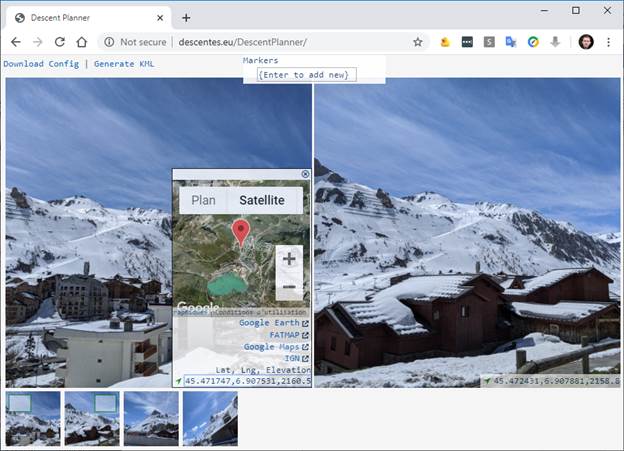
The system needs an accurate position for every photo, and while the longitude/latitude will likely be accurate, the elevation is unlikely to be.
If you recorded the elevation independently when you took the photo, you can simply change it in the textbox. If not, there are potentially a few of ways of improving it:
Using Google Earth
Google Earth’s elevation readings are most accurate in large, flat areas, or large areas of equal incline. They are really poor for the elevation of peaks (use an IGN map for that).
Clicking on the Google Earth link will open another tab in Google Earth, showing the point.
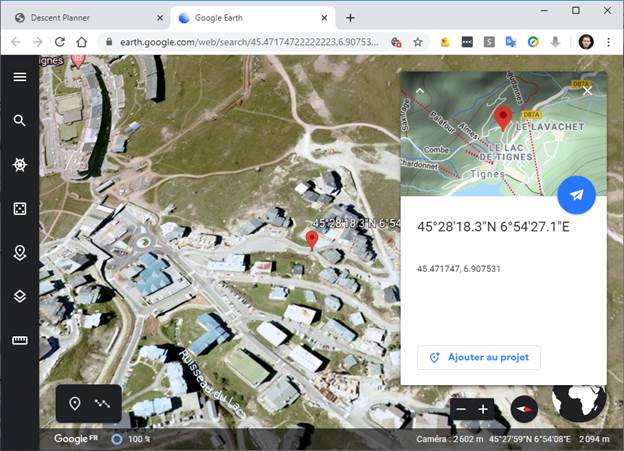
While the elevation isn’t displayed, Google Earth will include the elevation within the URL, for instance:
To make things easier, you don’t need to find the elevation within the URL, just copy the entire URL and paste it into the coordinates textbox – the system will retrieve the coordinates from the URL and update them automatically. You don’t even need to delete what’s in the textbox, just paste it anywhere:
Add to the elevation manually to compensate for the snow depth and for your height (assuming you were standing up when taking the photo).
Using Fatmap
Sometimes Fatmap has better data than Google Earth, sometimes not. Sometimes it’s easier to understand the terrain with a winter view. Click the link to open Fatmap.
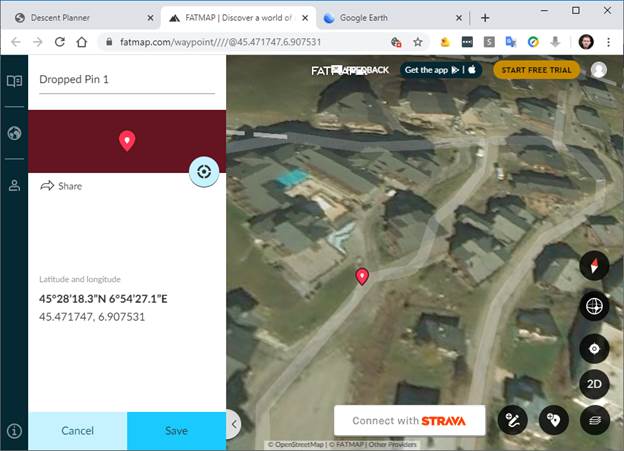
Annoyingly, Fatmap doesn’t update the URL automatically with the elevation.
To get the elevation, you need to move the icon slightly by right-clicking somewhere else on the map. Zoom in as far as possible, move the icon, then move it back to the same position.
The elevation should now be in the URL, e.g. https://fatmap.com/waypoint////@45.4717455,6.9075338,5000,-90,0,2095.6273977,normal,edit
As with the Google Earth link, you can just copy and paste this back into the Descent Planner.
IGN
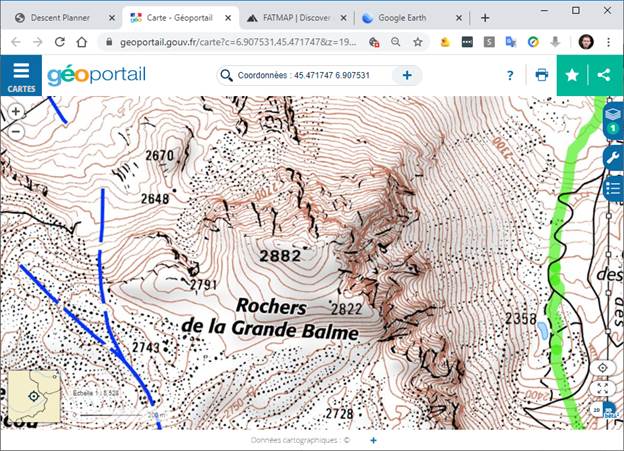
For finding the elevation at peaks and cols, IGN is the best source. There is no way (that I know of) that the system can link to show an icon on the exact location so it just centres the map on the location. To show the exact location, copy and paste the coordinates into the search bar:
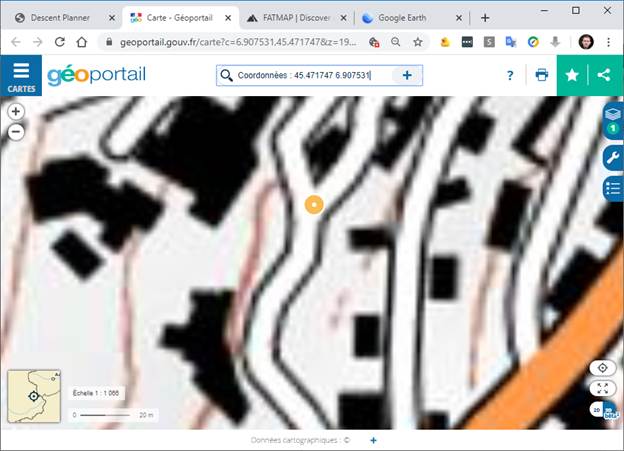
You can get a rough idea of the elevation from the contour lines anywhere – but this works best at peaks and cols where there is a point elevation shown:
Setting Known Position Markers
Knowing the location of the camera is not good enough – the system also needs to know which way the camera is facing, how much it is tilted and its field of view. To allow it to calculate this, you need to give it two known position markers.
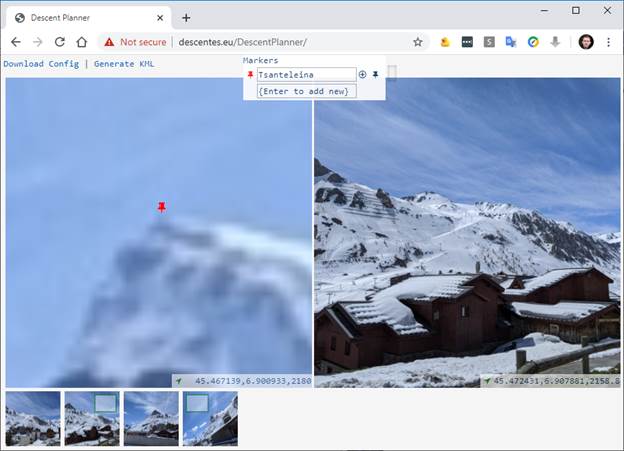
These work best when they are as far away as possible. Use the mouse wheel to zoom in closely to the distant object, in this example we’ll use the summit of Tsanteleina. In the new marker textbox, give this marker a name and press enter:

When the marker has been created, pins appear either side of the name. These can be dragged onto the left and right photos. You can use different markers on each photo, you don’t need to drag them onto both. When you drag and drop the marker onto the photo, it will turn red:
Now you need to tell the system where this is in the real world. With peaks, it’s best to use IGN. Click the (+) next to the marker name and click on the IGN link:
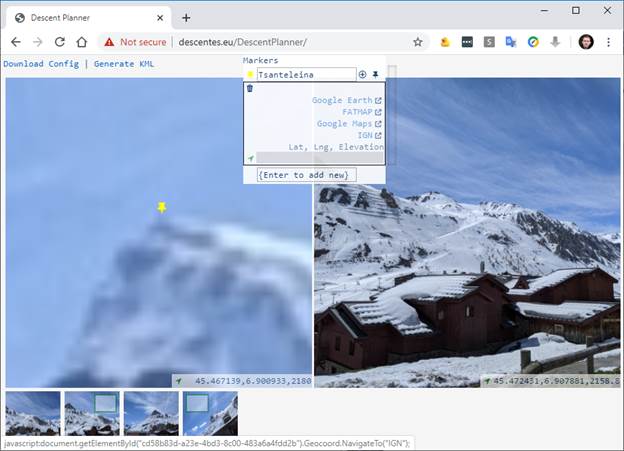
As there are no coordinates entered, the link will just take you to IGN’s mapping website. Search for a nearby town, then find the peak.
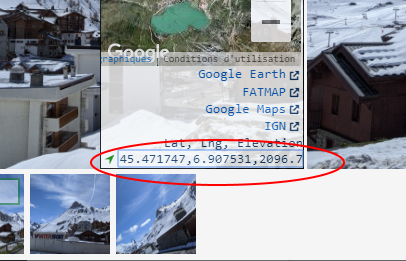
Once you’re there, right-click on the peak and choose “Adresse/Coordonnées de Lieu”. The longitude/latitude will be displayed:
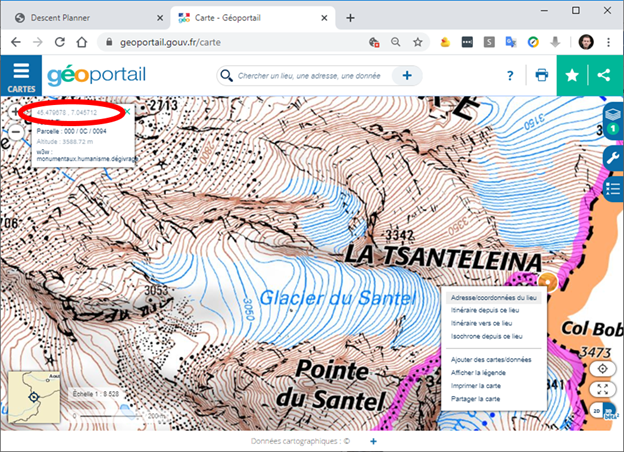
These coordinates can be copied and pasted back into Descent Planner, you must manually add a comma and elevation of the peak from the IGN map:

You can now click the plus icon next to the marker name to hide the details.
Zoom back out on that panel to see the whole photo:
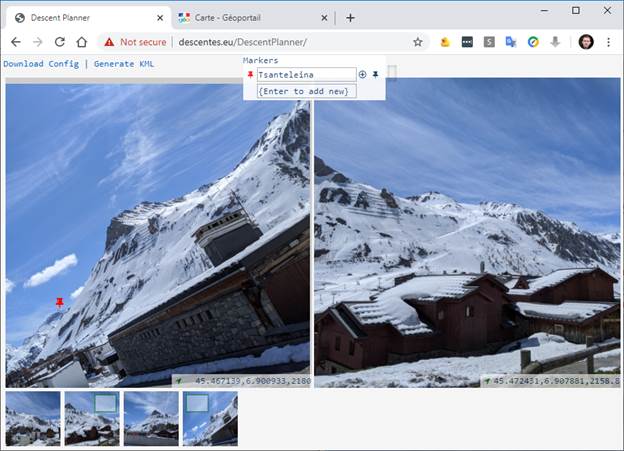
Unfortunately we don’t have a remote peak on the right of the photo, so we’ll need to use Toviere. As it’s close, we’ll need to be far more precise when we specify the location.
To get a more precise location, we’ll use Google Earth. Google Earth’s imagery shows the old Aeroski lift rather than the new Toviere lift in the photo, so instead we’ll use the hut at the top as a reference. Zoom into the area and keep double clicking on the corner of the hut on Google Earth:
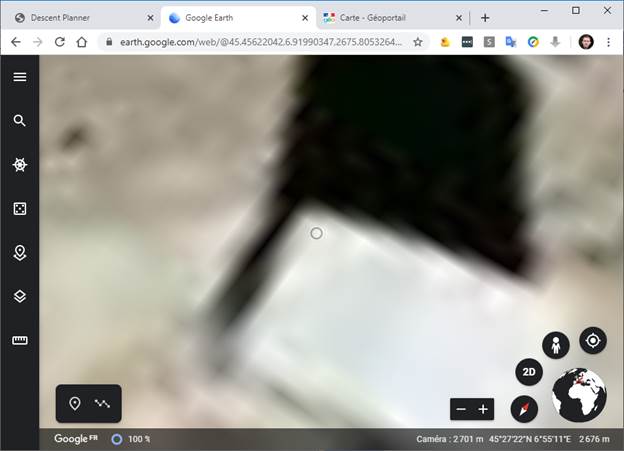
Now copy the URL from Google Earth and paste it into the Descent Planner:
As it’s at the top of a peak the elevation given by Google Earth won’t be very good (it’s actually wrong by 20 metres), so click on the IGN link to get the elevation from IGN and fix it.
Above, you’ll see I’ve dragged the pins onto both photos. Pins are grey when they haven’t been dragged onto the photo, red once they’ve been dragged on, and yellow as you hover the mouse over the marker.
You can remove a marker from an image by double-clicking on it, or remove the marker completely by clicking the (+) symbol followed by the bin icon.
The KML File
Now that one photo has been positioned with two markers, we’ve got the minimum amount of information to generate a KML file. Click “Download KML”. When the file downloads, move it to the same folder as the photographs, then open it in Google Earth. You need the Desktop version of Google Earth called “Google Earth Pro” for this. If you don’t have it, download it from https://support.google.com/earth/answer/21955?hl=en
When it opens, it will look something like this:
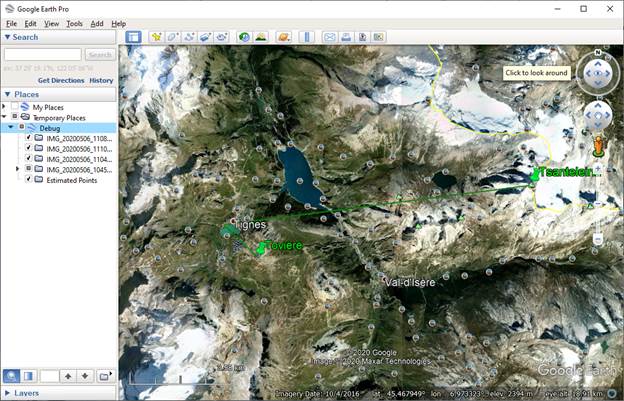
On the left hand side, there will be a folder for each of the images. As we have only added two reference points to one image, most of these will be empty.
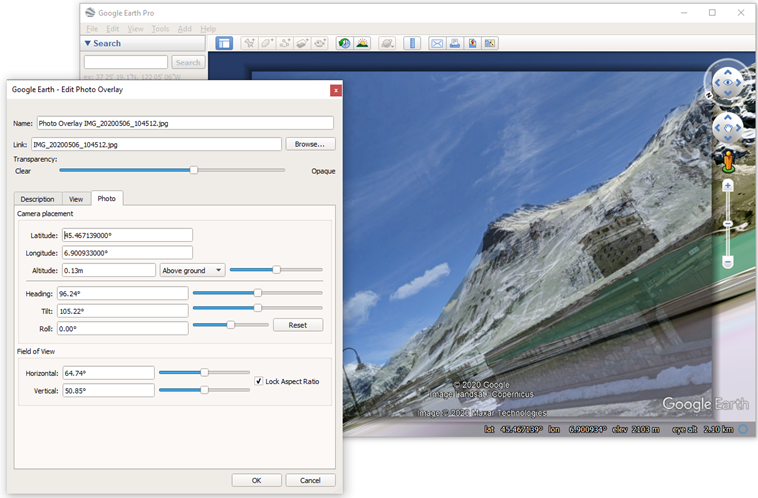
Open the folder for the image and double-click on the “Photo Overlay” item. From this view, you will be able to see how well the photo lined up:
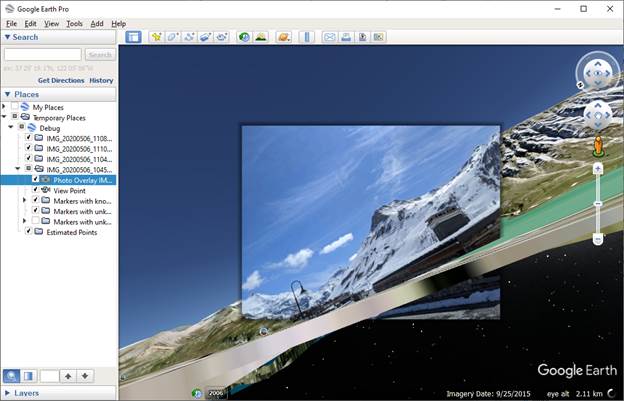
If, when you fly to the image, it “bounces” and flies out again, this means your viewpoint is below ground. To fix this, adjust the photo position’s elevation and re-download the KML file.
If you see a blank frame where there should be a photo, this means you haven’t copied the KML file into the same folder as the original image, or you’ve changed the image’s filename since uploading it.
If you right-click on the Photo Overlay and click “properties”, you can see it larger and adjust the opacity to see how well it has been lined up. If it’s not lined up, you’ve probably got some of the coordinates wrong.
Now repeat the process for the other photos. If you’re using the same reference points across multiple photos, you don’t need to recreate them – just drag the correct pin onto the photo.
To get the thumbnail photos into the top panes, just drag & drop them.
Change the Markers?
If your photo isn’t 100% lined up, consider if you can use another marker. There may be a peak just visible in the distance over a ridge, but you don’t know which that peak is. Now the image is more or less lined up in Google Earth, it’s going to be a lot easier to figure out which peak it is.
Saving your Work
Nothing is saved on the web server – to save your work, click “download config”. Store the file along with the photos. Next time you want to work, you can just drag the file onto the browser with the images.
Plotting a Line
If you add markers without GPS coordinates, the system will try to calculate their position. This will help you plan the route. Here’s a route planned through the avalanche barriers:
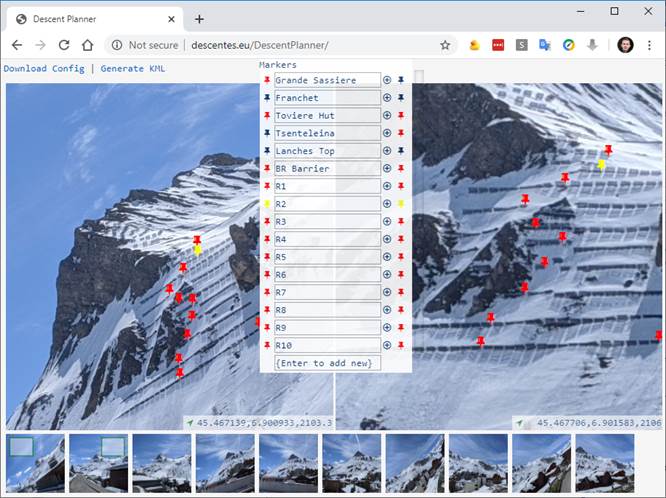
When adding the markers, try and identify something in the terrain – a small rock, an obvious lump of snow. If you just put markers in open white space, you won’t be able to be sure you’re putting them in the same place on every photo.
By giving several markers the same name, but ending in a different number, the system will create a KML path between them. You don’t need to include every number, so numbering them “R10”, “R20” etc will mean it will be easy to put markers between them later without editing all the numbers.
There is no need to put every marker on every photo. If it’s not visible on a photo, just leave that marker out. So long as each point is on at least two photos, the system will be able to produce an estimate where it is – but more photos will generally mean better accuracy.
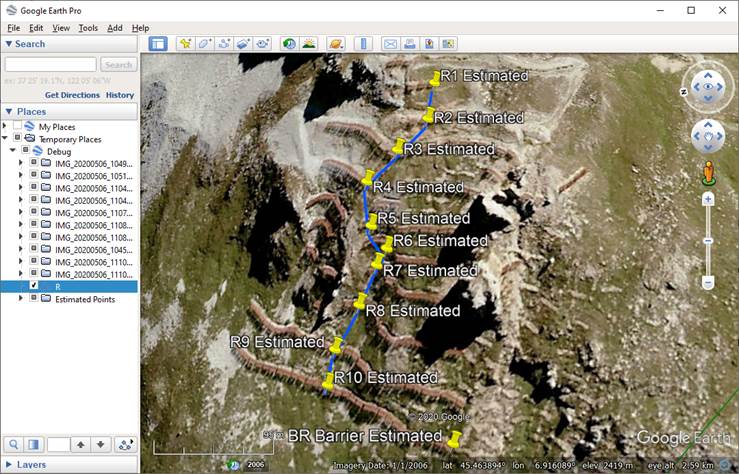
Estimated Points in Google Earth
After placing these markers, the KML file will now contain predictions of where these points exist. Download the KML file again to view (don’t forget to copy it to the same folder as the images and open it from there):
Checking the Vectors
The points are estimated by calculating the line from each camera and seeing where they cross. The lines are shown in the KML file, and we can use them to try and see if there are any obvious problems with the data.
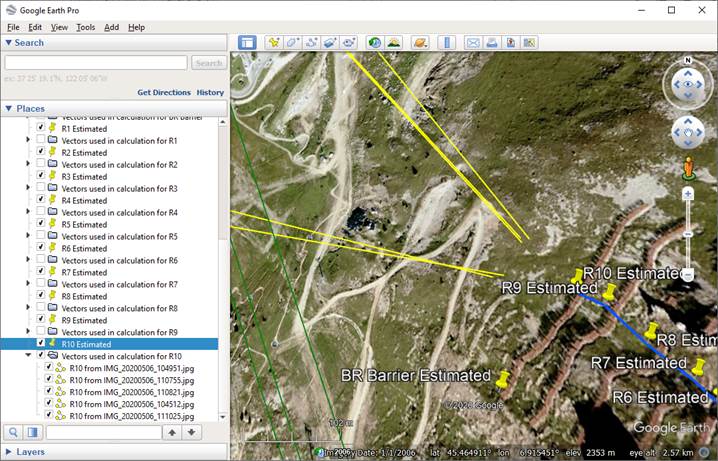
In the “Estimated Points” folder, after each marker is a folder showing the vectors that were used to calculate that position. By checking the checkbox on the folder, we can display them. Here are the ones used to calculate R10:
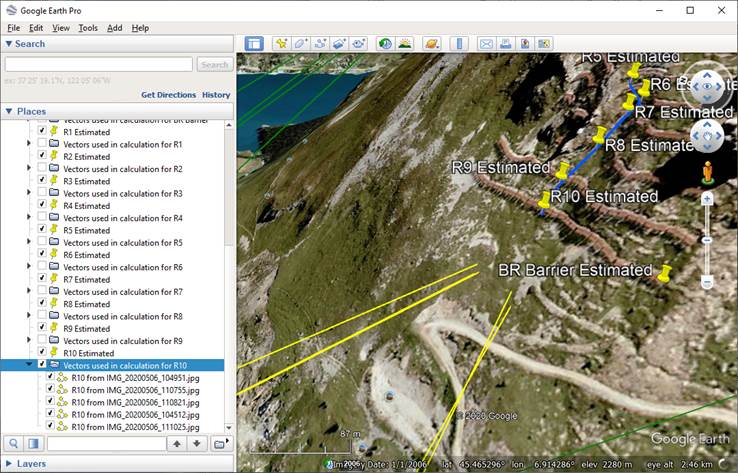
The first thing you’ll notice here is that the vectors are significantly lower than the pin. This is because the pin is set to display as “clamped to ground”.
It may look like the vectors have wrong height, but most of the error is from Google Earth. On steep slopes like this where the gradient levels out further down, the elevation data Google has is averaged over the distance – so while this slope is concave, Google will show an even gradient. Either way, this doesn’t really matter. When skiing, you’re (mostly) stuck to the ground. If you’re in the right latitude and longitude and your skis are on the snow, you’re at the right elevation!
If you press “R” in Google Earth, it will rotate the view so you look straight down.
As they all go underground, you may get a clearer view from the vectors in the subfolder “Clamped to Ground”. These are the same lines, except they are set to follow the ground which makes it easier to see where they cross:
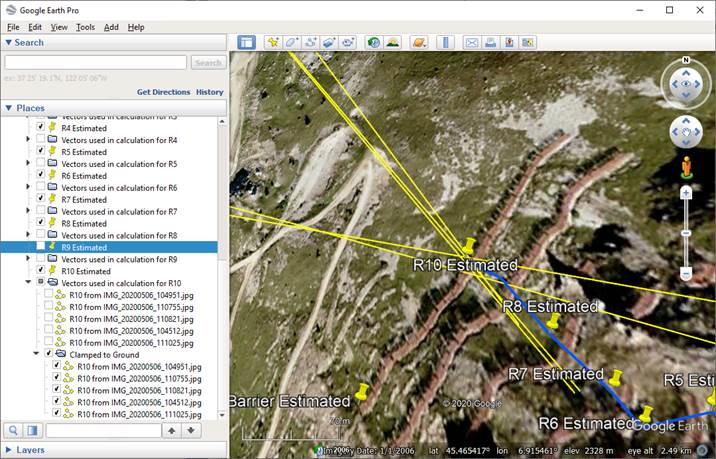
These lines are handy to see if there is one misaligned photo that is different to the others. If that’s the case, try lining up the photo a bit better, or if you can’t – delete it to stop it causing inaccuracies. This is part of the reason for taking more photos than you need – sometimes it’s just difficult to get one orientated properly.
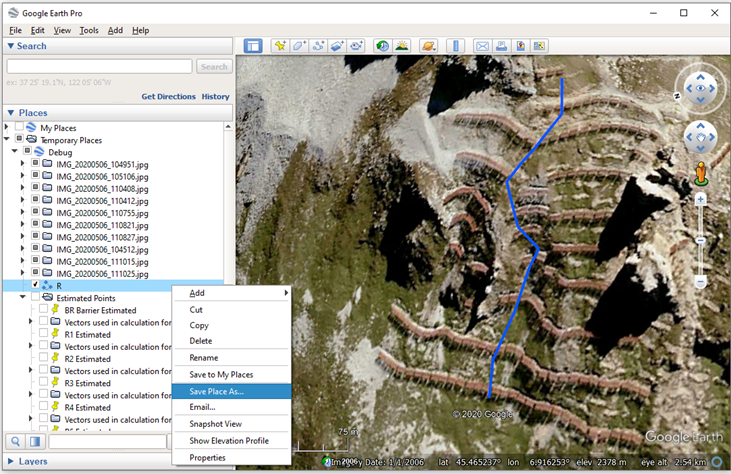
Navigating
At some point, you’re going to want to export the GPS track so that you can check you’re going the right way on the descent. This is as easy as right-clicking on the track and saving it. This can then be followed with a Sunnto watch or other GPS device. If your device requires a GPX file, you can find converters online such as https://kml2gpx.com/.
Measuring Slope Angle, Slope Aspect & Distances
The points can also be used to measure the angle and aspect using a triangle over three points.
To calculate slope angle, you need to find three points on the slope that are identifiable across at least two photos. Add markers, and give them a name that ends in <1, <2 and <3, for instance:
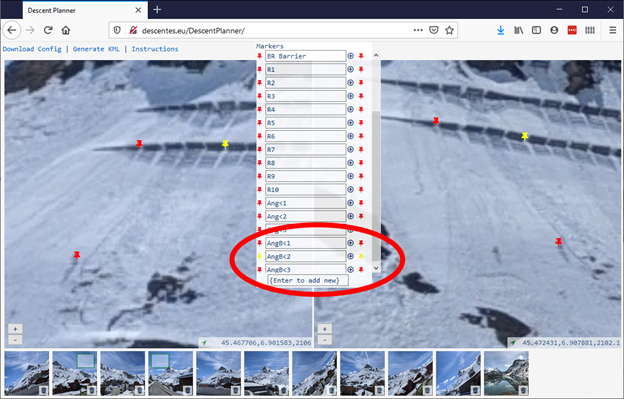
When the KML is generated you will be able to see the result:
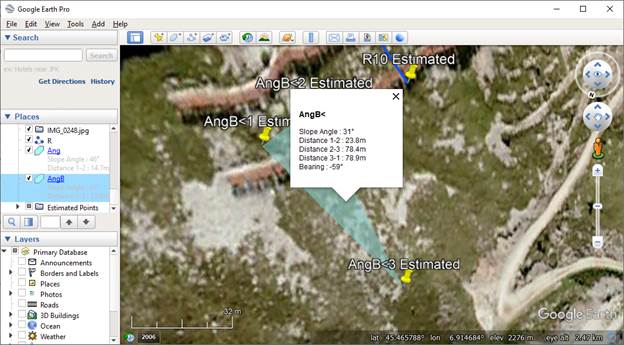
Notice that the system also displays the lengths of each side of the triangle, allowing this to be used to figure out how wide a gap is.